
Rotomolding Defects: Causes and How to Prevent Them

The most common rotomolding defect is bubbles or voids in the part wall, and the most common root cause is under-cure: the resin did not get enough heat for long enough to fully melt, densify and release its trapped air. Most other defects trace to the heat cycle too. Warpage comes from cooling, brittleness from over-heating, thin spots from rotation and mold heat transfer.
TL;DR
- Read every defect as a heat-history problem first. Ask where in the cycle the part got too little heat, too much heat or the wrong cooling rate.
- Bubbles, pinholes and a rough inner surface usually point to under-cure. Brittleness and a yellowed inner surface point to over-cure.
- Warpage and uneven shrinkage are cooling problems, and a blocked vent can cause several of them at once.
- Thin spots and bridging come from the rotation ratio, mold wall heat transfer and part geometry.
- Use the symptom, cause and first-check table at the end of this guide to start any investigation.
A cracked tank or a warped housing usually arrives on the engineer’s desk with a guess already attached: bad resin, a worn mold, an operator mistake. Those guesses are usually wrong. The part only saw a sequence of heating, rotation and cooling. Find the point in that sequence where it went wrong and the fix is usually obvious.
This guide is for the quality or manufacturing engineer with a defective rotomolded part in hand, and for the one judging whether a supplier understands its own process. It covers the defects that show up most often, where each starts and how to correct it.
How do you diagnose a rotomolding defect?
Diagnose a rotomolding defect by matching what you see on the part to the phase of the cycle that produces it, then checking that phase first. Rotational molding has five phases where a defect can start: charging the mold, heating, rotation, cooling and demolding.
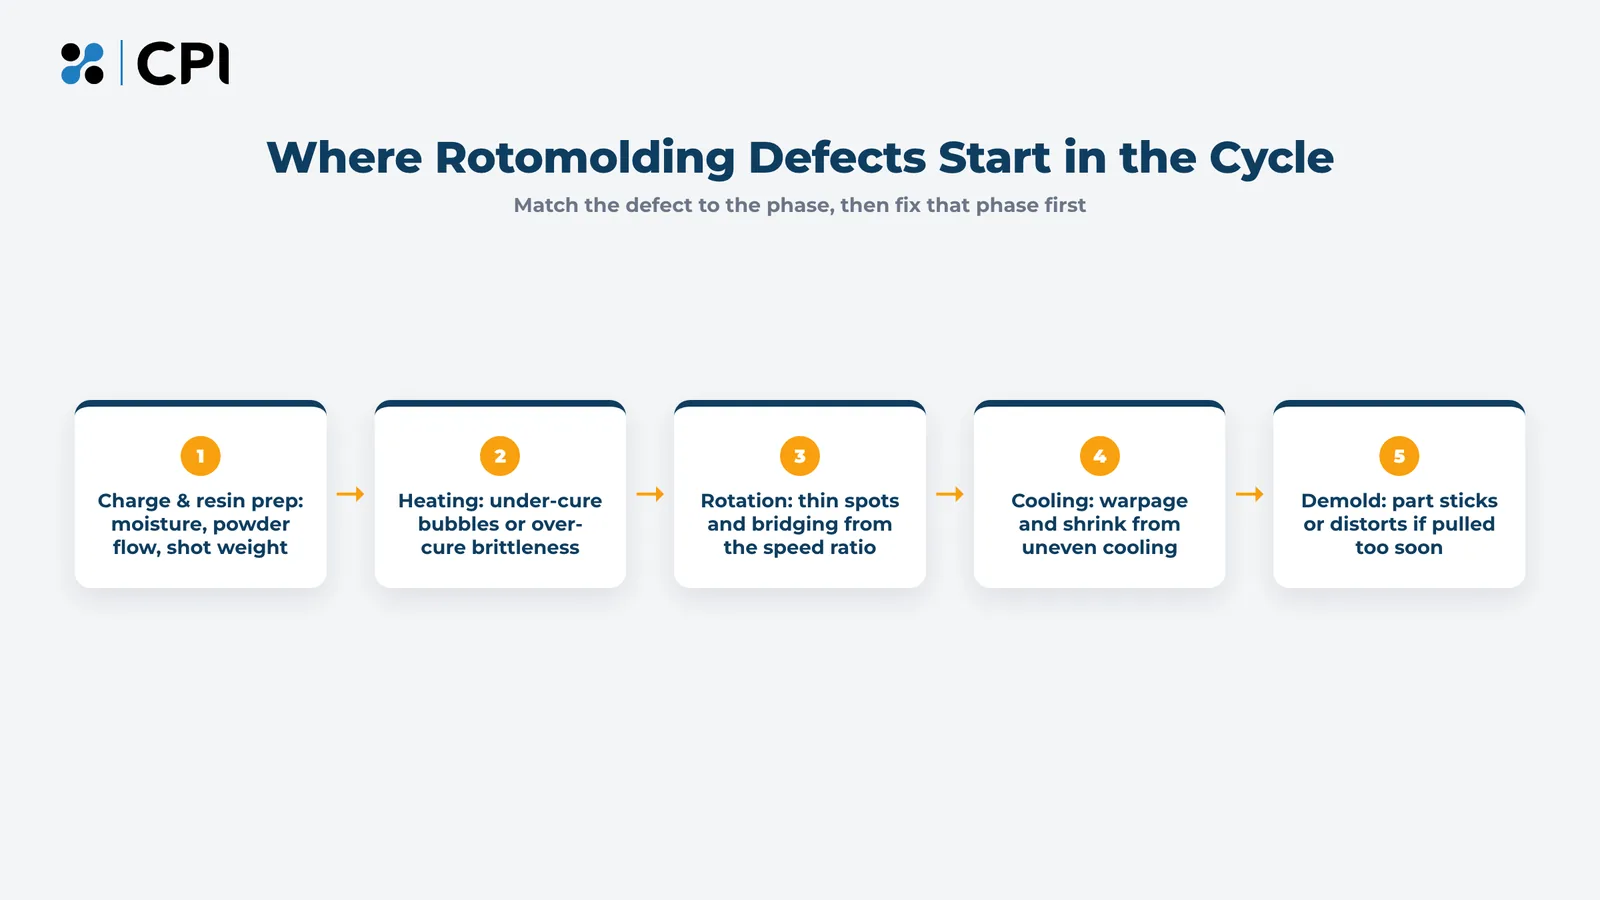
Each phase leaves a recognizable mark on the part, and a cross-section shows most of what happened inside the mold.
Cut a section and read the inner surface
Take a sample from the defective area and one from a good area of the same part. Compare four things:
- Inner surface texture. Smooth and glossy means the resin fully melted. Rough, grainy or powdery means it did not.
- Bubble content in the wall. Hold the section against a light. Many small bubbles through the wall indicate under-cure.
- Inner surface color. Yellowing or browning on the inside of a light-colored part indicates oxidation from too much heat.
- Odor. A sharp, burnt smell from a fresh cut is another over-cure signal.
Decide which side of the cure window you are on
Polyethylene, the resin family used for most rotomolded parts, has a processing window. Below it, the resin has not fully melted and densified. Above it, the resin begins to degrade.
Defined Term: Cure window
the range of heat exposure in which a rotomolding resin fully melts, consolidates and releases trapped air without degrading. Under-cure sits below the window, over-cure above it.
A rough, bubbly inner surface means under-cure. A glossy but discolored inner surface on a part that breaks in a brittle way means over-cure. If the inner surface looks right and the defect is a shape problem, look at rotation and cooling.
Rule out the mold before you change the cycle
A cycle change affects every part in the run. A mold problem usually affects one location on every part. If the defect appears in the same spot every time, check the mold wall thickness there, the vent, the parting line and any area shielded from oven airflow.
What causes bubbles and voids in rotomolded parts?
Bubbles and voids in the wall are almost always a sign of under-cure. As powder melts against the mold wall, air gets trapped between the particles. With enough heat and time, the melt consolidates and that air dissolves or migrates out. Cut the heat short and the bubbles stay in the wall.
Defined Term: Peak internal air temperature (PIAT)
the highest temperature reached by the air inside the mold during heating. Process engineers in rotational molding use it as the most reliable single indicator of whether a part reached full cure.
Measure the internal air temperature
The air temperature inside the mold tracks the state of the resin far more closely than oven set point or oven time. Industry practice is to measure it with a probe system mounted to the mold during trials, then hold the cycle to the peak internal air temperature that produced good parts. Resin suppliers publish a recommended range for each grade, which is the right starting reference.
Fix under-cure in this order
- Extend oven time in small increments and re-check the inner surface on each trial part.
- Look for areas shielded from oven airflow by the spider, the arm or neighboring molds. A shielded zone will under-cure while the rest of the part looks fine.
- Check mold wall thickness. A thicker section heats more slowly and creates a local cold spot.
- Confirm the shot weight. An overcharged mold produces a thicker wall that needs more heat to cure through.
Separate surface pinholes from wall bubbles
Pinholes on the outer surface are a related problem. They usually come from air trapped between the first layer of powder and the mold surface, often because of mold surface porosity, a degraded release coating or moisture. Treat them as a mold-surface and resin-handling problem first.
Why do rotomolded parts warp?
Rotomolded parts warp because different areas cool and shrink at different rates. Polyethylene shrinks significantly as it cools and crystallizes. When one side pulls away from the mold before the other, or one area cools faster, the part locks in internal stress and distorts after demolding.
Control the cooling rate on both sides of the wall
Cooling only from the outside means the outer skin solidifies while the inner surface is still soft, which drives warpage on large flat panels. Common corrections are to slow the first cooling stage with forced air before any water mist, and to add internal air cooling on larger parts.
Keep the part in contact with the mold until it is rigid
A part that releases too early shrinks freely and unevenly. Overly aggressive mold release makes this worse. Some processes use slight internal pressurization during cooling to hold the part against the mold wall. Set a demold temperature for each part and hold it, since pulling parts at different temperatures produces different amounts of shrinkage.
Design flat areas to resist distortion
Large flat walls are the hardest shape to keep flat in rotational molding, and a design change often does more than any cycle change. A slight crown, ribs, kiss-offs or a textured surface stiffen the wall and hide small variations. CPI covers this pattern in its article on why rotomolded parts fail in the field.
What causes thin spots and uneven wall thickness?
Thin spots come from the rotation ratio, uneven heat transfer through the mold wall, or geometry the powder cannot reach evenly. Wall thickness depends on how much time each area of the mold spends hot and in contact with the powder pool.
Defined Term: Rotation ratio (speed ratio)
the ratio of major-axis speed to minor-axis speed on a biaxial rotomolding machine. It controls how the powder pool travels inside the mold and is the main lever for evening out wall thickness.
Set the rotation ratio for the part shape
A common industry starting point for compact, roughly symmetrical parts is a 4:1 ratio. Long, flat or offset parts usually need a different ratio so the powder reaches the ends and corners. Run test parts at two or three ratios, section them at the same points and compare wall thickness.
Balance heat across the mold wall
Areas of the mold that run hot pick up more resin, and areas that run cool pick up less. Thick mold sections, deep recesses and areas shielded by the spider all run cool. Corrections include adjusting mold wall thickness, shielding areas that run too hot and adding airflow amplifiers to areas that run cold.
Check corners and deep sections in the design
Sharp inside corners and narrow, deep sections collect less resin than open areas. Generous radii and wider gaps let the powder build a consistent wall. Rotational molding tolerances and design guidelines set these limits, and they belong in the design review before the mold is built.
Why does resin bridge across ribs and narrow gaps?
Bridging happens when the gap between two mold walls is too narrow for powder to coat both sides separately. Resin builds on both walls, the layers meet across the gap, and the result is a solid section or a void where a hollow rib was intended.
Widen the gap or change the feature
A general design rule in rotational molding is that the gap between two parallel walls should be several times the nominal wall thickness. If the feature is meant to be solid, design it as a kiss-off, where the two walls deliberately fuse. If it is meant to be hollow, open the gap.
Use powder with good flow
Poorly ground powder, or powder with a high share of tails and fines, flows less freely and bridges sooner in the same geometry.
What does a brittle rotomolded part tell you?
A brittle rotomolded part is usually over-cured. Too much heat or time at temperature oxidizes the resin on the inner surface, breaking down the polymer chains and lowering impact strength. The part can look perfect outside and still fail a drop test.
Look for the over-cure signature
Over-cured parts typically show a glossy inner surface, often with yellow or brown discoloration and sometimes a burnt smell when cut. Impact failures start at the inner surface and travel outward.
Reduce heat exposure step by step
- Shorten oven time in small steps and track peak internal air temperature.
- Check whether the resin grade has enough stabilizer for the cycle. Resin suppliers can advise on grades with a wider processing window.
- For long cycles, purge the mold with inert gas during heating, an established method for reducing inner surface oxidation.
Test impact at low temperature
Brittle failure shows most clearly in the cold. A low-temperature drop impact test is the standard way rotomolders and buyers check that a part was processed inside the cure window.
How do moisture and resin handling cause defects?
Moisture causes surface pinholes, bubbles near the outer surface and streaked color. Polyethylene absorbs little water, but moisture condenses on cold resin, pigments and additives, then turns to vapor in the hot mold and leaves voids at the surface.
Store resin where it cannot pick up condensation
Bring resin to shop temperature before use. Powder moved from a cold warehouse into a warm molding area collects condensation. Keep containers closed and away from doors and wash-down areas.
Blend color evenly and check each lot
Speckled or streaked color usually comes from poor pigment dispersion, moisture or static in dry-blended powder. Pre-compounded colored resin removes most of this risk at a higher material cost. Particle size and dry flow also affect wall uniformity and finish, so run a basic powder check on new lots, especially after a material change.
Have a part that has to survive the field?
Send a drawing and photos of the defect, and CPI Products’ team in Port Washington, Wisconsin will review where in the process it is likely starting.
Why does one blocked vent cause several defects?
A blocked or undersized vent can produce bubbles, warpage, blowholes and parting line flash on the same part. The vent lets air move in and out as the air inside heats and cools. When it is blocked, pressure builds during heating and a vacuum forms during cooling.
Defined Term: Mold vent
a tube from the outside of the mold into the cavity that keeps internal pressure close to atmospheric through heating and cooling. Vents are usually packed with heat-resistant filler to keep resin from escaping.
Know what a vent failure looks like
During heating, trapped pressure forces air through the soft resin at the parting line, leaving blowholes and pushing resin into any gap. During cooling, a vacuum pulls the part away from the mold wall in some areas and inward in others, leaving warpage that looks like a cooling problem.
Inspect and size the vent
- Check the vent filler every shift. Resin can creep into it and seal it.
- Confirm the vent is sized for the mold volume. Large molds need larger or multiple vents.
- Position the vent where resin is least likely to block it, usually near the center of a flat face.
Check the parting line and clamps
Flash also comes from worn or misaligned mating surfaces, uneven clamp pressure and damaged edges. Inspect the parting line for wear and dents, and confirm every clamp applies even pressure. A single loose clamp can leave flash along one edge.
Which rotomolding defects come from part design?
Several production defects are set at the design stage: warpage on large flat walls, bridging in narrow ribs, thin walls at sharp inside corners and poor bonding around inserts in a cold area of the mold. A cycle change can reduce these problems, and a design change is usually what corrects them.
Review the design against rotomolding rules before tooling
- Use generous radii on inside and outside corners.
- Keep the gap between parallel walls well above the nominal wall thickness, or design a deliberate kiss-off.
- Add crown, ribs or texture to large flat areas.
- Add draft on surfaces that release from the mold.
- Place inserts where the mold runs warm enough for resin to flow around them.
Decide early if rotomolding is the right process
Very thin walls, tight tolerances across large dimensions or very high volumes may point to blow molding or injection molding. CPI’s comparison of blow molding vs rotational molding works through that decision.
What should you check first for each defect?
Use this table as the starting point for any rotomolding defect investigation.
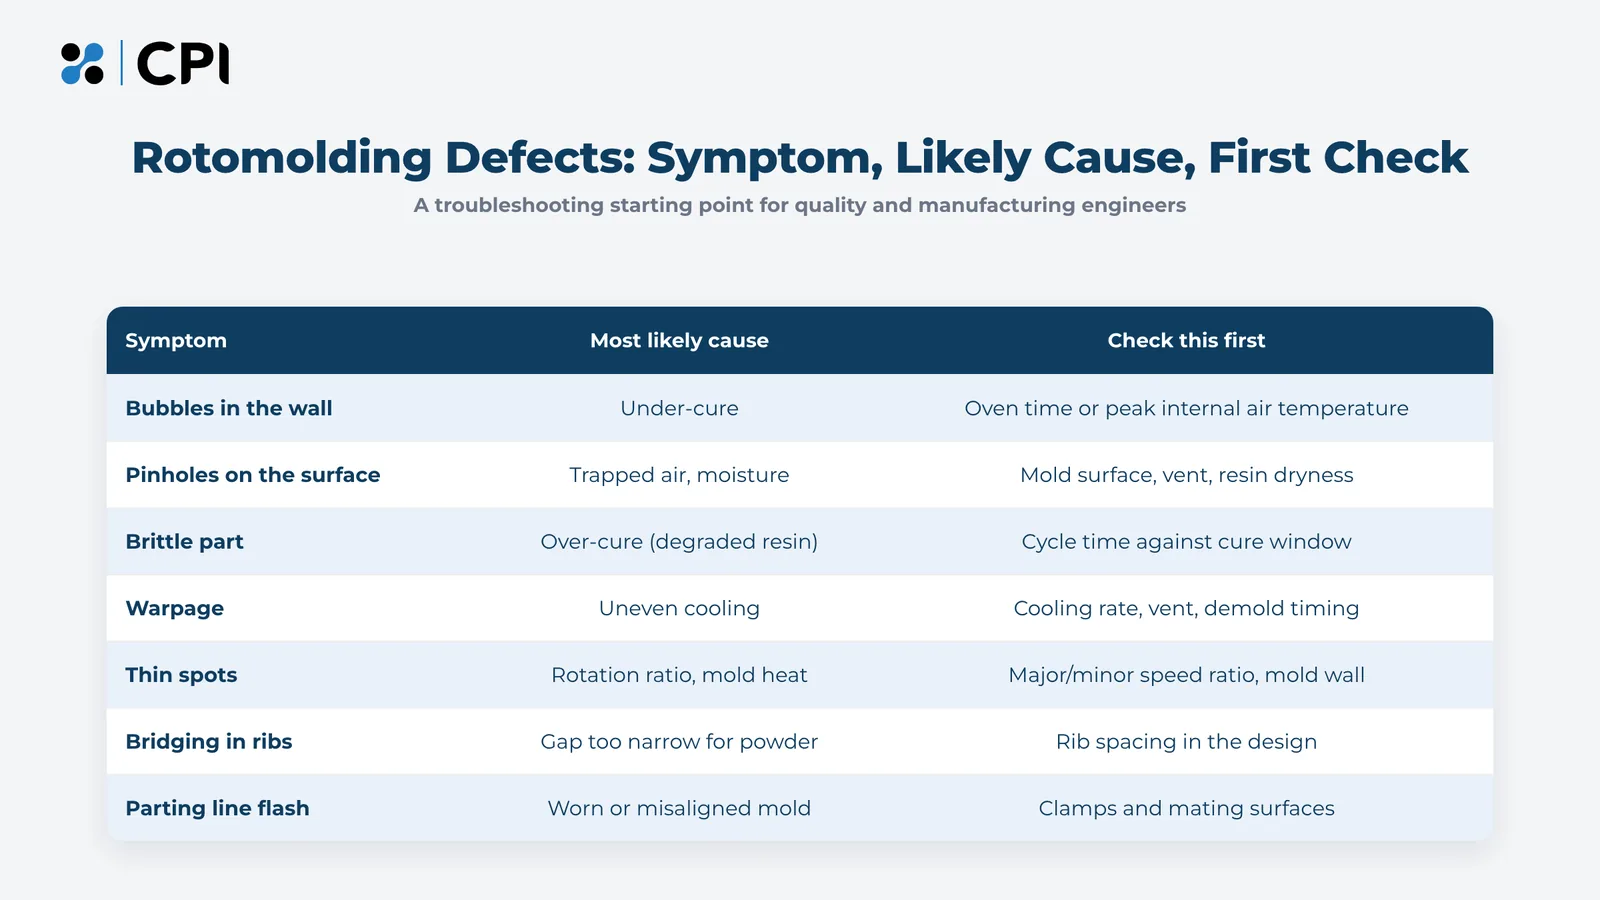
| Symptom | Most likely cause | Check this first |
|---|---|---|
| Bubbles in the wall | Under-cure | Oven time, peak internal air temperature |
| Outer surface pinholes | Trapped air, moisture | Mold surface, vent, resin storage |
| Rough inner surface | Under-cure | Oven time, shielded mold areas |
| Brittle part, yellowed inside | Over-cure | Oven time against processing window |
| Warpage | Uneven cooling, early release | Cooling rate, vent, demold temperature |
| Thin spots | Rotation ratio, mold heat | Speed ratio, mold wall thickness |
| Bridging in ribs | Gap too narrow | Rib spacing in the design |
| Streaked color | Poor dispersion, moisture | Blending method, resin storage |
| Parting line flash | Worn mold, loose clamp | Mating surfaces, clamp pressure |
| Parting line blowholes | Pressure during heating | Vent filler and size |
How do you evaluate a rotomolding supplier’s process control?
Ask a rotomolding supplier how they would diagnose a specific defect on your part. A supplier with good process control will ask about heat history first, will want to section the part, and will talk about internal air temperature, rotation ratio and cooling rate in specific terms.
Ask these questions during supplier review
- How do you measure whether a part reached full cure?
- How do you set and record the rotation ratio for a new part?
- What is your cooling sequence, and do you cool large parts internally?
- How often are vents and parting lines inspected?
- How do you store and qualify incoming resin?
- What happens when a defect appears mid-run?
Bring the part and the drawing together
A defect review goes faster with the defective part, a good part if one exists, and the drawing. The drawing shows where design choices may contribute, and the parts show what the process did.
Have a part that has to survive the field?
Bring a problem part and its drawing, and CPI will walk through where in the cycle the defect is likely starting and what would change it.
About the author: CPI Products is a custom rotational molding manufacturer in Port Washington, Wisconsin, with decades of experience producing custom polyethylene parts from prototype through production.
Related reading:
- Rotational Molding: A Complete Guide to the Process
- Inside the Mold: How Process Control Shapes Quality in Rotational Molding
- Blow Molding vs Rotational Molding: How to Choose